I own dozens of pocket knives and carry at least one whenever I go hunting to perform tasks like skinning, preparing the game etc. Even though I feel tired after getting back home, I sharpen it immediately so that the blades don’t get dull.
There are 3 methods I use to sharpen my knives in different situations and I’ll explain them to you in this post.
Method 1: Sharpen a Pocket Knife Using a Whetstone
This is the method I follow regularly whenever I get back from hunting and doesn’t take more than 15 minutes.
Tools you’ll need:
- A sharpening stone (AKA Whetstone)
- A marker.
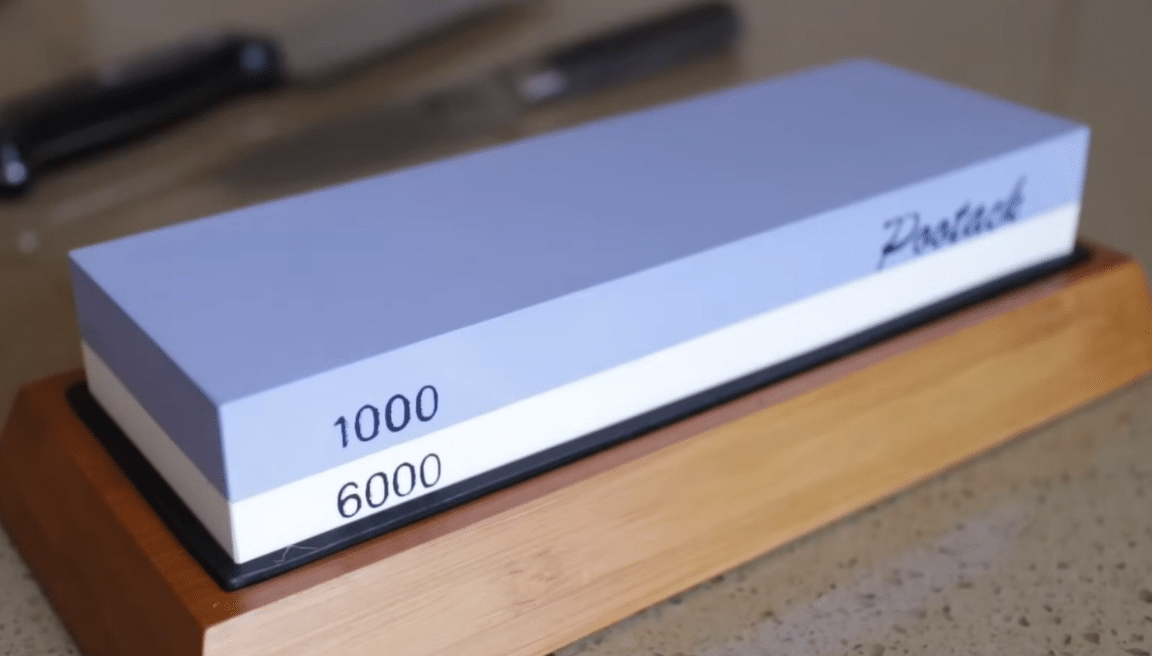
Using a whetstone is one of the most common and traditional way to sharpening a knife with the grinding and honing process.
When choosing a whetstone, always go with dual-sided stones; a coarse and a fine side. A coarse side (150-220 grit) helps the dull blade take on a good shape, whereas the fine side (600-1000 grits) refines the edge.
I use the Intelitopia knife sharpening stone, but you can get any other whetstone depending on your budget.
Step 1: Immerse the sharpening stone in a small tub for 5-10 minutes. Once the air bubbles stop coming out, it means the stone is ready to use.
Step 2: Use the marker to mark the knife edge to ensure you sharpen your knife properly.
Step 3: Place the sharpening stone on a flat surface and hold your pocket knife vertically at 90°Degree in the coarse grit.
Tilt the knife in half and then repeat the same step to set the blade at a 22.5-degree angle.
Watch this video if you aren’t sure about this step.
Step 4: Go back and forth a couple of times until you see a burr on the blade. Repeat the same process on the other side of the knife and ensure you have a burr on both sides.
Step 5: Use the fine side and follow the same process. Once you are done, you’ll have a knife with excellent sharpness.
A good whetstone won’t cost you more than $50 and it’ll last anywhere between 3-5 years.
Method 2: Sharpen the Knife without a Sharpener
Some of my EDC pocket knives go unused for a couple of months and I use a guided system to sharpen them.
Each guided system comes with a different sharpening hone for different purposes.
I’m using the 5-Stone Ceramic Knife Sharpener by Lansky, and the honing rods I get on this are:
- Coarse red hone– For repairing dull and damaged edges.
- Medium green hone– Standard repair and edge refinement.
- Fine blue hone– Regular touchups to maintain the sharp edge.
- Ultra-fine ceramic yellow hone– For final polishing and to get a razor-sharp finish.
- Serrated medium hone– To sharpen the serrated blades.
You can select a similar sharpening guided system to sharpen your knife. A good model for a reliable brand would cost you between $50-$100. If you maintain it properly, it can easily last anywhere between 5-10 years.
Once you get one, follow these steps.
Step 1: Secure the knife to the center of the clamp if the blade is 7 inches or shorter. If it is more than that, work on each section of the blade separately.
Step 2: Select the honing based on the blade’s condition. (coarse, fine, etc.)
Step 3: Attach the rod to the sharpening stone. Use the flat surface such as a table while attaching the rod to ensure proper alignment and maintain a consistent sharpening angle.
Step 4: Select the angle you want to sharpen your pocket knife. My guided system has four different sharpening angles: 17, 20, 25, and 30. For a pocket knife, I always prefer the 25-degree angle as it provides excellent results.
Step 5: Now that the angle is set, start sharpening the knife by moving the hone forward.
Always hold the hone steady while sharpening and use the same number of strokes on both sides of the knife for a balanced edge. Don’t apply excessive pressure during this process.
Watch this video if you have doubts about this process.
Method 3: Sharpen the knife with a sandpaper
When I leave for camping or hiking with my friends, I keep sandpaper in my backpack to sharpen my knives because a whetstone or a guided system is relatively heavy to carry in such situations and takes a lot of space.
Step 1: Clean the knife with a soft cloth to remove any residue from it.
Step 2: Place the sandpaper on a flat surface like a table top and hold in your dominant hand.
Step 3: Set the knife at a 22.5-degree angle and draw the knife in a clockwise pattern for 4-5 times.
Step 4: Repeat the same process in the anti-clockwise pattern.
Step 5: Again, clean the knife with a cloth and you’ll have a sharp blade now.
Watch the video to clear your doubts.
Bonus Tip- Strop Your Knife
Stropping is the process of polishing a knife’s edge for better performance. It is not necessary but you can do it if you want a polished edge. I’m using 1-Piece Leather Strop by SHARPAL and would recommend the same. It provides effective results under $10 and can be used multiple times.
Step 1: Apply the compound to the strop surface 2-3 times.
Step 2: Hold the strop in your left hand and the knife in your right hand at a comfortable position.
Step 3: Place the knife at the bottom of the strop and move it towards you slowly. Don’t push the knife down as it’ll damage the edges.
Step 4: Turn the other side of the knife from the top and strop slowly towards the bottom. Don’t apply too much pressure. Using the normal strength will do the job.
This video explains more about the process.
How to maintain the sharpness of a pocket knife?
1. Clean them regularly
After using the knife for a certain period, dust, dirt and debris gets into the blade that can potentially damage it. I recommend you clean it with just a soft cloth before using it in such a condition.
2. Lubricate the blade
When you don’t intend to use a particular knife for some time, it is advisable to lubricate the blade so that it can protect from getting the rust. Make sure to use the right lubricant based on the manufacturer’s guidelines and applying one or two drops would be just fine. Over-applying it may damage the blade.
3. Store it in a safe place
Always store your knives in a dry place far away from getting moisture. If you have multiple knives, store them separately. As you know, I have hundreds of knives and I don’t mix them up. I’ve cabinets, blocks, and stands to store them safely.
Having a sheath would be even better as it could protect the blade even if you accidently drop it.
FAQs
1. What should I use to sharpen a pocket knife?
You can use a whetstone, guided sharpening system or a sandpaper to sharpen your knife.
2. Do you push or pull when sharpening knives?
You need to do both while sharpening your knife. From my experience, I find both of these methods effective while sharpening.
3. What must you not do when sharpening a knife?
These are the mistakes you shouldn’t go:
- Over sharpening: Doing this may damage the blade and impacts on its durability.
- Using inconsistent angles: Always use the same angle consistently for effective sharpening.
- Using the wrong grit: Choose the right side of the grit to sharpen the blade.
- Ignoring the manual: Some manufacturers provide specific guidelines to sharpen their products and skipping this could impact the durability of the blade.
- Applying uneven pressure: It could result in dent and even sharpening.
4. Can I use WD-40 to sharpen knives?
No, you can’t use it to sharpen the knife because it leaves additives behind and may result in damaging the knife.
Conclusion:
Each time you use your pocket knife, the blade gets chipped at a microscopic level or the edge gets misaligned. You need to sharpen the blade regularly like I do after hunting to perform any task with it effortlessly.
I have had my dad to teach me how I can sharpen my pocket knife and if you don’t have any such person, use this post as a guide to learn the process. Let me know If you have any questions in the comments and I’ll get back to you soon. Cheers!
Hi Jamie,
Does sharpening a pocket knife decreases the lifespan?
Hi Michael,
No. It doesn’t however, over sharpening may decrease the lifespan. Thank you.