Whenever I leave for hunting, I make sure my knives are sharp. If they aren’t, the first thing I do is, hone them. As I take off my knives regularly, just honing does the job for me and get the sharpness back in just a couple of minutes.
The process of honing is straightforward yet many people don’t know how to do it right away. Also, some people have the misconception that honing and sharpening are the same thing but they aren’t. In this post, I’ll discuss how honing is different from sharpening and share the right way to do it.
Before you hone your knife, you should take a look at the condition of your knife blade.
How to check If Your Knife is sharp
1. Use the sharpener tester
Among various tools and methods, the BESS certified sharpness tester is the first one I check. It provides precise and consistent data than other tools.
There are many other options in the market and you can opt with any one of them but make sure to get it from a reliable brand for accurate results.
To test the knife, place a wire across the scale, put some pressure to cut down the pressure until it gets cut. If the numbers are lower, your knife is sharp, if it is higher, it is dull.
Here’s a video that explains the process.
If you don’t want to spend your money testing the knife sharpness, follow the next 2 methods.
2. The Finger Nail Test
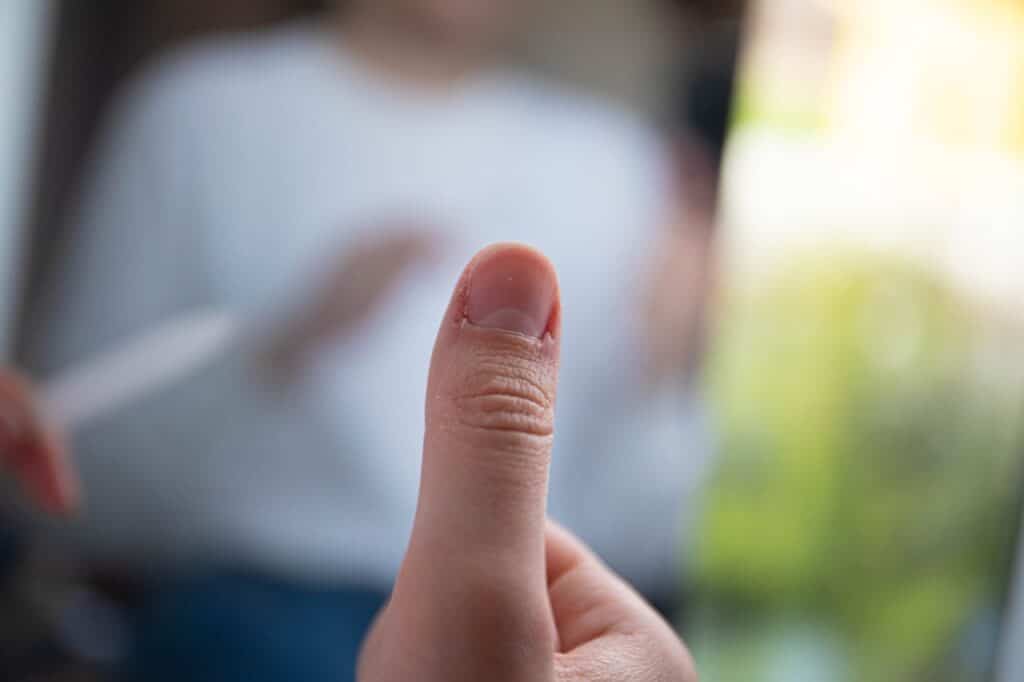
When I’m not home, I use this method as I don’t need any device for the test.
Hold the knife in your preferred hand (right or left) and try to slice the fingernail in your other hand. If the knife slices off the edge, your knife isn’t sharp. If the knife cuts the nail, it is sharp.
3. The Paper Test
If I have a paper when I’m outdoors, I follow this method.
I take a piece of printed paper and try cutting it horizontally. If I can cut the paper without any interruptions, it means the knife is sharp. If I can’t cut it, the knife is dull.
Honing vs Sharpening: What’s the difference?
A knife has micro serrations and when you use it for any task for sometime, it’ll get microscopic teeth. When these teeth get bent after a period of use, you may not be able to cut anything.
With honing, you realign those microscopic teeth with abrasive steel, ceramic, or diamond-encrusted rod. Some people call these rods as “sharpening rod”, “sharpening steel” but the right term for this tool is “honing rod”. Your knife doesn’t lose any steel with the honing process.
Sharpening is the process of removing steel to re-establish the apex geometry of your blade’s edge to build a new set of sharp teeth.
Things you need for honing
- A honing rod.
- Dish towel or cutting board.
- A piece of paper (optional).
What is a honing rod?
It is a tool that helps realign the edge of a knife. It just realigns the existing microscopic teeth that helps the knife cut anything effortlessly as before.
A honing rod comes with various materials and some of the common ones are metal, ceramic and diamond. I use a ceramic rod as it is suitable for all knife types and is durable. I would recommend you get the same If you have a long-lasting honing rod for your knife.
If you don’t have a honing rod at the moment, you need to get one. A basis model would cost you around $20-$40 and premium models could go up to $100.
I use a Messermeister ceramic sharpening rod that costs under $50 and provides excellent results.
Once you have it and the other 2 items I’ve mentioned, you can proceed to hone your knife.
How to Hone a Knife: A Step-by-Step Guide
Step 1: Know the angle
To hone the knife properly, you must know the right angle. If you are honing a knife for the first time, I recommend you place and hold the sharpening rod on your kitchen countertop or cutting board and place the knife heel at the top of the rod at around a 15-20 degree angle.
Step 2: Draw the knife
Put low pressure in the rod and slowly draw the knife from the heel to the top of the knife. Use the same amount of pressure and repeat the step 7-8 times on one side of the blade.
Step 3: Hone the other side
Hone the other side of the blade by following the same process and again, use low pressure while drawing the knife.
Still have some doubts? Watch this video.
How to Sharpen Your Knife Without a Rod
When I’m out of town and have no access to my rod, this is what I do.
I use the unglazed and the rough bottom rim of your ceramic coffee mug to hone a knife.
Here’s what you need to do:
- Place the coffee mug upside down and hold it one hand securely.
- Hold the knife in the coffee mug rim at a 20-degree angle.
- Gently draw the knife for 4-5 times on one side and then repeat the same process on the other side of the blade.
FAQs
1. What does it mean to hone a knife?
It means realigning the microscopic teeth in the blade that have bent after using it for a period of time.
2. Is honing better than sharpening?
No. Both are different. You need to hone the knife to align the blade teeth whereas sharpening removes the metal in the blade to create a new sharp edge.
3. Does honing a knife dull it?
No. It doesn’t. It just realigns the microscopic edge that has bent.
4. Can you ruin a knife with a honing rod?
No. Using a honing rod can’t damage the knife unless you are doing excessively or using it the wrong way.
5. Should I wash my knife after honing?
Yes. Washing your knife after honing is a good way to remove the tiny metal abraded during the process.
Conclusion:
For beginners, honing might seem like a huge task, but once you start practicing it, you’ll get used to it, and it’ll not take more than 5 minutes of your time. Making it a daily ritual will help improve the lifespan of your knife because you aren’t sharpening it to remove the steel; you are just realigning the microscopic teeth, which is essential for a sharp blade.
If you have any questions about honing, please comment down below and I’ll back to you soon.